Overclocking the "Mystic" Colour Classic (LC / Performa 575)
WARNING!!: This tutorial could damage your LC / Performa 575 motherboard if done improperly. Proceed at your own risk!Introduction
This hack is a little more complicated to implement than my Quicksilver overclock. It involves modifying the motherboard which could lead to a very dead Mystic. The advantage is an immediate improvement in every aspect of speed on the Macintosh LC 575 or Mystic Colour Classic.
One suggestion would be to add a heatsink of some kind to the processor as more Hertz means more heat! I'm using a heatsink from a i486 DX2 I had kicking around. Low enough and small enough to fit within the Colour Classic enclosure.
Tools Required
For this hack I used:
1 Soldering iron
1 Small side cutters
1 Wire strippers
1 Magnifying glass (helpful but optional)
Solder
Solder wick
Quick set epoxy glue
Thermal paste
Q-tips
Isopropyl alcohol
Scotch tape
1 Small piece of breadboard
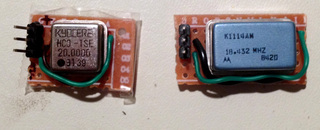
1 Crystal oscillator (18-21.5MHz)
1 2.54mm DuPont 3pin header (salvaged from an old PC)
1 2.54mm DuPont 3pin female connector with wire. (from old PC power button)
Prepping The Patient
1. Remove the back port cover.
2. The motherboard is friction fitted. Carefully pull the board free from the back of the unit.
3. Clean the area around the processor with q-tips and isopropyl alcohol to make for a clean work area.
4. Check the aluminum capacitors for leaking electrolyte, if you find some, first perform a re-cap. If you need help see my pages on SE/30 restoration or my Macintosh Classic.
Surgery
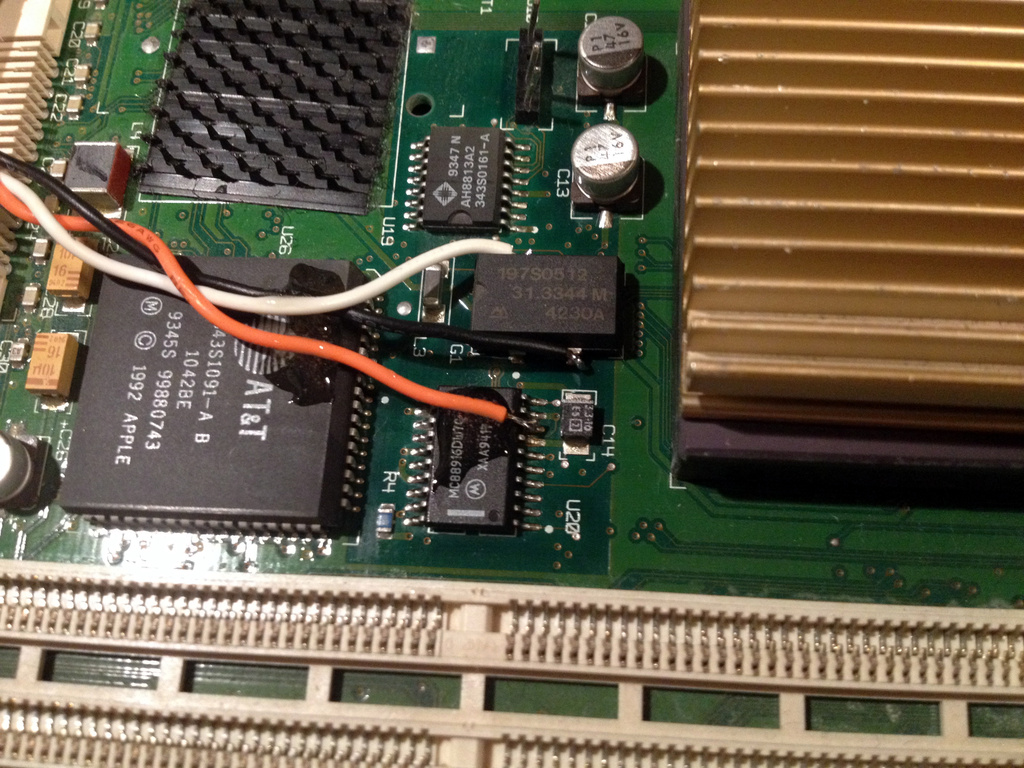
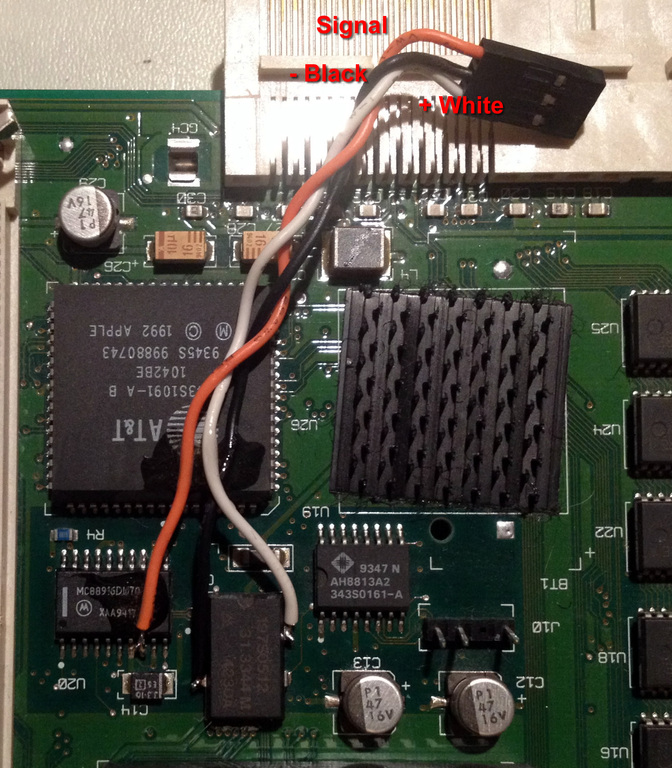
I highly recommend examining the technical diagram for this hack hosted at Jag's House (See link at bottom of page). Really this should be all you need to mod your own. I opted to build my own osc circuit boards to quickly swap in and out since the parts were what I had on hand.
1. Using the soldering iron, carefully lift up leg 8 of the MC88916DW70 away from it's pad. Solder a signal wire to this leg.
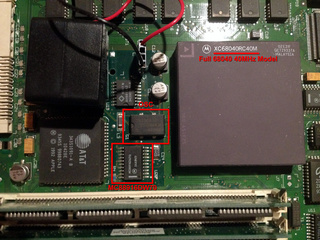
2. Solder two wires to the 31MHz Oscillator one for ground, the other for power.

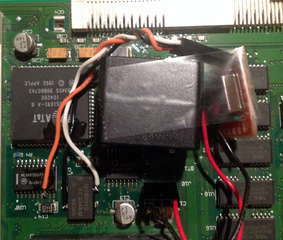
3. Using the epoxy glue, secure the new wires to the motherboard so they don't come loose.
4. Build the oscillator circuit.
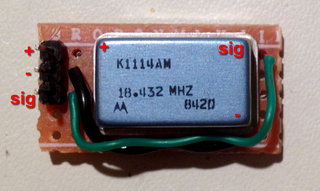
5. Plug the oscillator circuit into the wires soldered on the motherboard.

Results
I initially tried this overclock using a 20MHz oscillator for 40MHz. I had a perfect startup; I could hear the computer booting and Macintalk warning me about my time being wrong.... But no video....
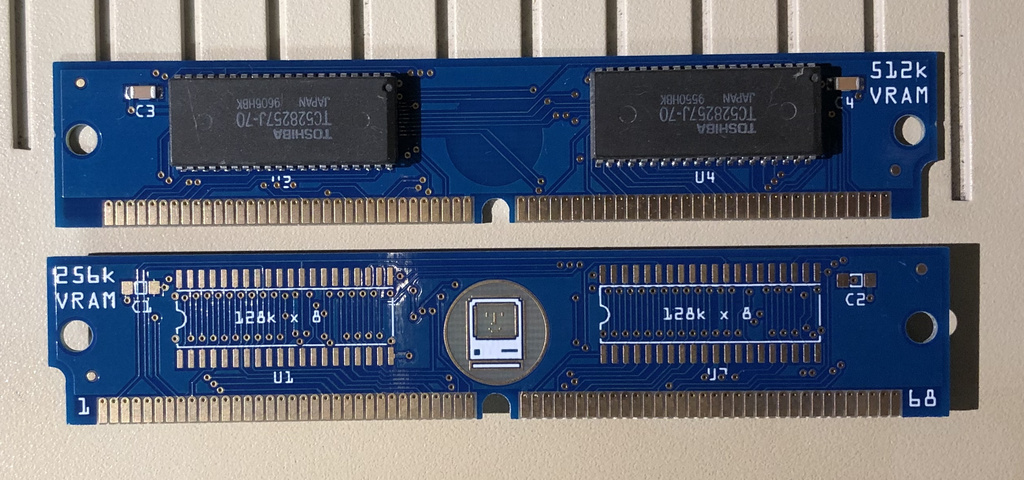
According to Takashi Imai who developed this technique, this is due to the 80ns 68pin VRAM modules that I currently have installed. Apparently swapping these out for 70ns 68pin VRAM modules solves the issue due to the faster response time but I've found it very difficult to find this part at a reasonable price.
As a concession I opted for a more modest 18.432MHz crystal for 36.864MHz. This works fine with the 80ns VRAM and provides a decent boost across the board as seen in the results below. On the disk score I changed the name of the HDD between tests. Same drive, different name.
68040 @ 33MHz 68040 @ 36.864MHz Overclock P.R. Results (Uses Mac Classic as 1.0):
CPU: 20.843
Graphics: 21.260
Disk: 5.587 Name of Hard Disk tested: untitled
Math: 134.384
Performance Rating (OLD PR): 29.271
Performance Rating (NEW PR): 14.318
Benchmark Results (Uses Mac Classic as 1.0):
KWhetstones: 1818.181 249.066
Dhrystones: 25423.728 26.093
Towers: 24.960
QuickSort: 22.391
Bubble Sort: 24.545
Queens: 25.444
Puzzle: 30.113
Permutations: 27.850
Fast Fourier: 163.069
F.P. Matrix Multiply: 166.333
Integer Matrix Multiply: 32.576
Sieve: 28.318
Benchmark Average: 68.396
FPU Tests (Uses Mac II as 1.0):
FFPU Fast Fourier: 14.636
FPU KWhetstones: 5000.000 7.000
FPU F.P. Matrix Mult.: 14.827
FPU Test Average: 12.154
Color Tests (Uses Mac II as 1.0):
Black & White: 6.040
4 Colors: 6.491
16 Colors: 6.769
256 Colors: 7.016
Color Test Average: 6.579P.R. Results (Uses Mac Classic as 1.0):
CPU: 23.698
Graphics: 25.621
Disk: 5.911 Name of Hard Disk tested: Mystic HD
Math: 150.875
Performance Rating (OLD PR): 33.435
Performance Rating (NEW PR): 15.851
Benchmark Results (Uses Mac Classic as 1.0):
KWhetstones: 2000.000 273.972
Dhrystones: 28571.428 29.323
Towers: 28.363
QuickSort: 25.750
Bubble Sort: 27.931
Queens: 28.625
Puzzle: 33.125
Permutations: 30.944
Fast Fourier: 183.453
F.P. Matrix Multiply: 190.794
Integer Matrix Multiply: 36.826
Sieve: 32.224
Benchmark Average: 76.777
FPU Tests (Uses Mac II as 1.0):
FFPU Fast Fourier: 16.100
FPU KWhetstones: 6000.000 8.400
FPU F.P. Matrix Mult.: 15.925
FPU Test Average: 13.475
Color Tests (Uses Mac II as 1.0):
Black & White: 6.771
4 Colors: 7.280
16 Colors: 7.610
256 Colors: 7.879
Color Test Average: 7.385
Update!
Well looky what I have here! The retro hobbyist community never fails to come up with good solutions. There are a few people on eBay now who are selling new-old stock VRAM modules. And I just happened to grab a pair of 512KB 70ns RAM modules for about $90CDN (this being 2022). I splurged....
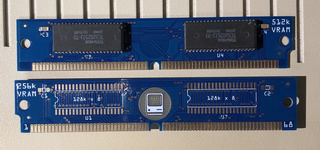
If you look closely, you can see the date codes on one of the modules. Looks like these chips are dated from 1995 and 1996 on a brand new PCB. Installing them was no problem, I swapped out my oscillator for the 20Mhz model (which brings us up to 40Mhz) and she boots, with a picture!

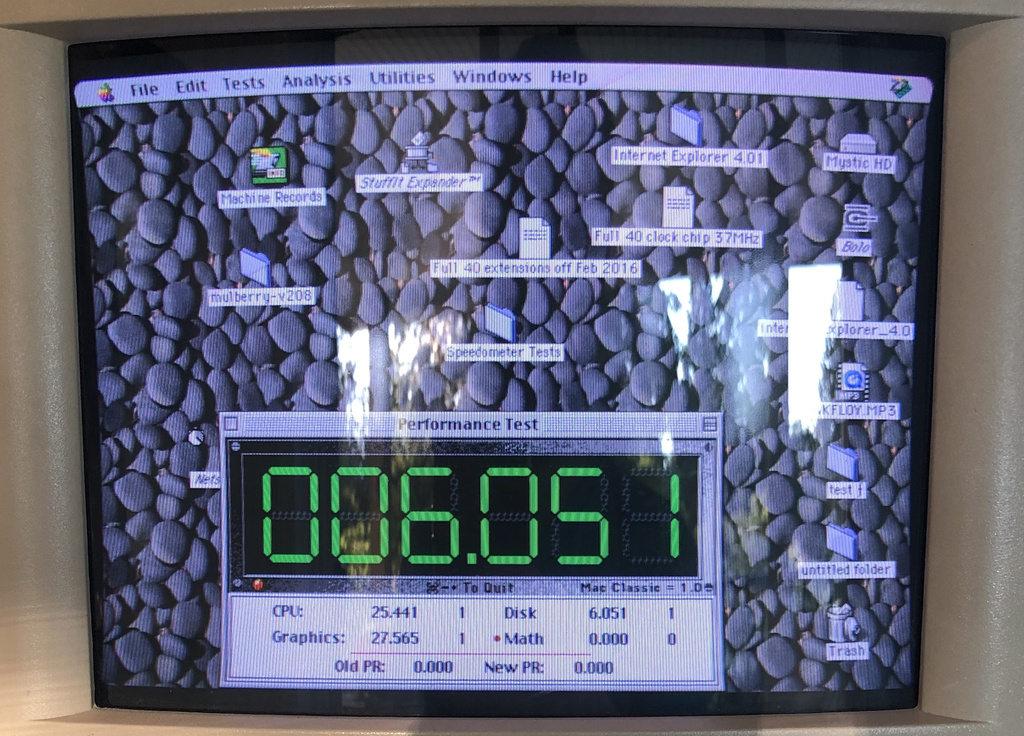
Let's run a speedtest now....
68040 @ 40MHz P.R. Results (Uses Mac Classic as 1.0):
CPU: 25.441
Graphics: 27.565
Disk: 6.051 Name of Hard Disk tested: Mystic HD
Math: 163.933
Performance Rating (OLD PR): 36.049
Performance Rating (NEW PR): 16.593
Benchmark Results (Uses Mac Classic as 1.0):
KWhetstones: 2222.222 304.414
Dhrystones: 30927.835 31.742
Towers: 31.200
QuickSort: 27.105
Bubble Sort: 30.000
Queens: 30.533
Puzzle: 36.805
Permutations: 33.757
Fast Fourier: 199.000
F.P. Matrix Multiply: 209.258
Integer Matrix Multiply: 38.500
Sieve: 34.611
Benchmark Average: 83.910
FPU Tests (Uses Mac II as 1.0):
FFPU Fast Fourier: 17.888
FPU KWhetstones: 6000.000 8.400
FPU F.P. Matrix Mult.: 17.916
FPU Test Average: 14.735
Color Tests (Uses Mac II as 1.0):
Black & White: 7.384
4 Colors: 7.948
16 Colors: 8.298
256 Colors: 8.554
Color Test Average: 8.046
Once again, upping the speed by 7Mhz makes a huge difference. It's rock solid too. Safe to say I've got one of the fastest Motorola Color Classics out there.
Links
Macintosh Color Classic
Jag's House: Overclocking A Perfroma (sic) 575
Downloads
Speedometer 3.23
Last Updated: June 16, 2022