Scripting Guest WiFi Changes on Aruba Instant Part II
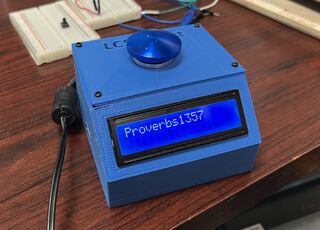
Well I did it and created a Raspberry Pi version of the Aruba Instant Wifi button. And yes, there is no Proverbs 13:57 (the numbers are random of course) but Proverbs is a great book.
While I was at it I decided to add an LCD to the thing so that if the paper in the printer runs out it will still show the code for the week. As a result I modified the code to print the LCD text as separate from the printer text.
This code is just similar to Part I in that it needs to be run with a cron job on the Raspberry Pi in order for the passphrase to rotate regularly. PHP 8.2, CUPS and php-curl are all required for this to work.
<?php

$controllerIP = "192.168.x.x";
$SSID = "GuestNetwork";
$username = "YourArubaUsername";
$password = "YourArubaPassword";
$file = "passphrase.txt"; // The name of the file we want to write to
$LCDFile = "lcd.txt"; //What to write to the LCD

//I got ChatGPT to make this array for me so I could save time not typing it myself.
$bible_books = array(
    "Genesis",
    "Exodus",
    "Leviticus",
    "Numbers",
    "Deuteronomy"
);

$random_key = array_rand($bible_books);
$random_value = $bible_books[$random_key];
//Choose a random number between 1000 and 2000 to append to first part of Passkey
$random_number = rand(1000, 2000);
//Generate our new passphrase
$newPassText = "\r\n\r\n" . $SSID . " passphrase for\r\ntoday is: " . $random_value . $random_number . "\r\n\r\n\r\n\r\n\r\n";
$newPass = $random_value . $random_number;

//Login to the AP and get a SID for further communications
$loginURL = "https://". $controllerIP .":4343/rest/login";
$query = '{"user":"'.$username.'","passwd":"'.$password.'"}';
$json = curlRequest($loginURL,$query);
$sid = $json->sid;

//Set the SSID Passphrase
$ssidURL = "https://". $controllerIP .":4343/rest/ssid?sid=". $sid;
$changeWPA = '{"ssid-profile":{"action":"create","ssid-profile":"'.$SSID .'","wpa-passphrase":"'.$newPass.'"}}';
$json = curlRequest($ssidURL,$changeWPA);

//Dump new passphrase to a text file so we can pick it up by another script.
if($json->message == "Success")
{
	echo $newPass;
	$lcd = $newPass;
	file_put_contents($file, $newPassText);
	file_put_contents($LCDFile, $lcd);
}

//Function for cURL
function curlRequest($url,$jsonText){
  $ch = curl_init();
  curl_setopt($ch, CURLOPT_SSL_VERIFYPEER, false);//Aruba Instant uses a self signed cert so we need this
  curl_setopt($ch, CURLOPT_SSL_VERIFYHOST, false);//and this.
  curl_setopt($ch, CURLOPT_URL, $url);
  curl_setopt($ch, CURLOPT_HTTPHEADER, array('Content-type: application/json'));//tell it that we're sending JSON
  curl_setopt($ch, CURLOPT_POSTFIELDS, $jsonText);
  curl_setopt($ch, CURLOPT_RETURNTRANSFER, true); //Make sure it returns to us as something useful.
  $result = curl_exec($ch);
  curl_close($ch);
  return(json_decode($result));
  }
?>
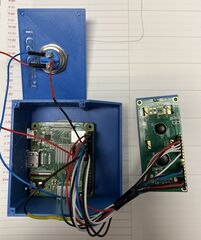
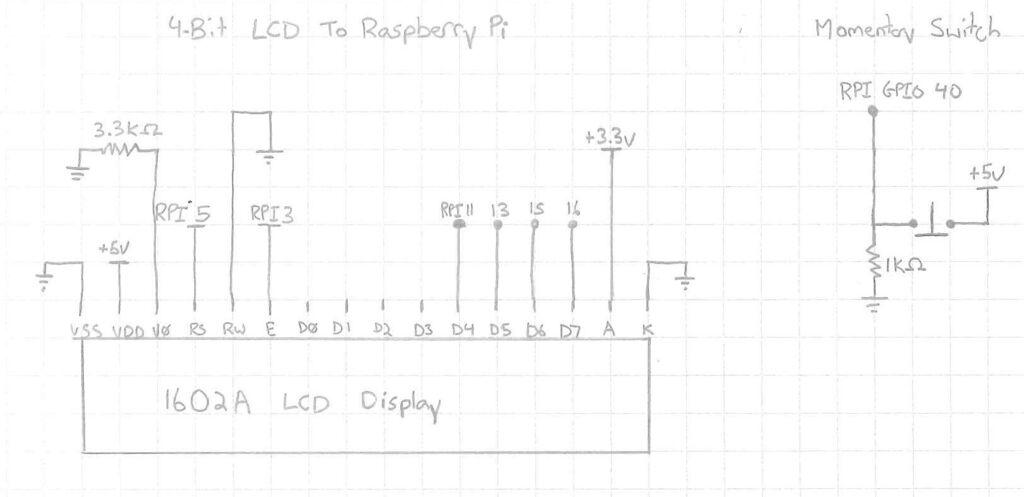
Wiring it up!
I chose a Raspberry Pi Model 3 A+ as it has a single USB Port on it that I can use to plug in the printer. To wire up the button and a 1602A 16x2 LCD I gotta make use of the GPIO pins. I think I drew the momentary switch symbol wrong... Meh... You get what it's supposed to be.
Raspberry Pi Code
We need some new code for our button. Here's the Python program necessary. You'll need to install a couple things first though....
sudo apt install pip
sudo pip install PRLCD
import RPi.GPIO as GPIO
import subprocess
import time
import socket
import os

gw = os.popen("ip -4 route show default").read().split()
s = socket.socket(socket.AF_INET, socket.SOCK_DGRAM)
s.connect((gw[2], 0))
ip = s.getsockname()[0]

readyMessage = "Ready\n\r" + ip

GPIO.setmode(GPIO.BOARD)
GPIO.setup(40, GPIO.IN, pull_up_down=GPIO.PUD_UP)

# Set up the LCD display
from RPLCD import CharLCD
import RPi.GPIO as GPIO


try:
    # Remove any old print jobs waiting
    subprocess.run(["sudo", "cancel", "-a"])

    lcd = CharLCD(cols=16, rows=2, pin_rs=5, pin_e=3, pins_data=[11, 13, 15, 16], numbering_mode=GPIO.BOARD)
    lcd.write_string(readyMessage)


    def button_callback(channel):
        # Read the text from the logo.txt file
        with open('lcd.txt', 'r') as f:
            text = f.read()

        # Send the text to the LCD display
        lcd.clear()
        lcd.clear()
        lcd.write_string(text)

        # Send the text to the thermal printer
        subprocess.run(["lp", "-d", "thermal", "logo.txt", "passphrase.txt"])

    GPIO.add_event_detect(40, GPIO.FALLING, callback=button_callback, bouncetime=300)

    while True:
    	time.sleep(0.1)
except KeyboardInterrupt:
    print("Program Exited with Keystroke.")
finally:
    GPIO.cleanup()
To auto-run this program we first need to use raspi-config to set autologin for the user we created. After this we set cron to run the Python script after boot.