68K Mac TCP/IP over Serial
Introduction
A while ago I saw an article about this guy who had got his Mac Plus on the internet using SLiRP on a Raspberry Pi and MacPPP (see link below). I thought, hmm that's really cool!
Recently I've been re-capping and restoring a Macintosh Classic and I now need some resources off my NAS (see 68K Mac and a NAS). Seeing that it doesn't have any expansion slots like my SE/30 and SE, this article jumped back to my mind. Unfortunately Keacher gives some good pointers but I was left scratching my head at some of the assumptions made about configuring SLiRP and MacPPP.
This page will attempt to help you through the whole process from start to finish.Equipment Used
1. Mac SE/30 running System 7.5.5(Still waiting on parts for that Classic!)
2. Null Modem Cable (serial cable from a mac hacked to a serial cable from a PC)
3. USB Serial Adapter or onboard serial
4. Dell Latitude running Xubuntu 14.04LTS connected to the internet. (should work with other flavours of Linux, Debian and Ubuntu variants covered here). January 2020, Raspbian on a Raspberry Pi 3 B+Theory of Operation
From Google: "Slirp (sometimes capitalized SLiRP) is a software program that emulates a PPP, SLIP, or CSLIP connection to the Internet via a shell account."
What we're going to do is configure the Linux server to use the USB Serial adapter as a console port. From there we'll get our Mac to make a serial connection using MacPPP to the linux server and run a script to start SLiRP which will tunnel us a TCP/IP connection which we can then use to connect to the internet and other resources (Like an AppleTalk AFP share on my NAS)!
Building a Null Modem Cable
If you've already got a way to make a connection between your Mac and PC via serial then great. For those that have a Mac serial cable and a PC Null modem cable then have a go at splicing them together using the diagram below.

Configuring the Server
Open up a terminal session and grab the SLiRP package from Aptitude. On Ubuntu variants you can usesudo, on Debian firstsu.
apt-get install slirp
I created this script in my documents path to help configure SLiRP properly. This will be run by MacPPP once it's console session is up.
nano ./Documents/slirp.sh
Type this in below...
#!/bin/bash
slirp -S -b 38400 -P "host addr 10.0.2.1" "dns 10.0.2.3" "asyncmap 000a0000" "debugppp debugppp.log" "debug 1" "mru 500" "mtu 500"
The -b option is Baudrate. My SE/30 works well at this rate. Keacher said his Mac Plus maxed out at 18000. -P is so SLiRP operates as a PPP server.host addris the gateway address for the Mac to connect to.dnsof course is the DNS address for the Mac to obtain DNS.asyncmaphas something to do with something I don't quite understand.mruandmtuare the ethernet frame sizes. This is what Keacher found worked best for him.
After saving the file (CTRL + O) make the file executable.
chmod 755 ./Documents/slirp.sh
Next we need to let Linux know to use the serial port as a console port. First we need to figure out which dev is our serial. Use this in terminal.
dmesg | grep tty
(Edit January 2020) Follow the steps below for Debian 14.04LTS and other non-Systemd platforms
Mine shows ttyUSB0 as my serial port. Next I need to create an init script to start the serial console on startup.
Again usesudoorsuto do this. We need this to be owned by root.
nano /etc/init/ttyUSB0.conf
# ttyUSB0 - getty#
# This service maintains a getty on ttyUSB0 from the point the system is
# started until it is shut down again.
start on stopped rc RUNLEVEL=[12345]
stop on runlevel [!12345]
respawn
exec /sbin/getty -L 38400 ttyUSB0 vt102
Again CTRL + O to save. As you can see the speed on this connection is 38400. Adjust according to your system.
You can now start and stop the serial console using the following command. This will also start automatically on system boot.
/etc/init.d/ttyUSB0 stop
/etc/init.d/ttyUSB0 start
End Non-Systemd section.
Systemd systems (Debian Jessie+, Ubuntu 15.04+, specifically Raspbian)
Systemd is a different beast from init based systems. After runningdmesg | grep ttyin Raspbian you'll need to set the terminal port and speed. Raspberry Pi has an internal serial port but you can also use a USB to Serial adapter.
Runsudo nano /boot/cmdline.txtand change the console settings to the appropriate serial speed and port (ex:console=ttyUSB0,38400).
If necessary enable and start the console in systemctl:
sudo systemctl enable serial-getty@ttyUSB0.service
sudo systemctl start serial-getty@ttyUSB0.service
You may need to reboot after this but your console should be working.
End Systemd
Configuring the Mac
1. Install MacTCP or OpenTransport (See Downloads at the Bottom of the page).
2. Install MacPPP (The Extension should go in the Extensions folder located in the System Folder and likewise the Control Panel in the Control Panel folder).
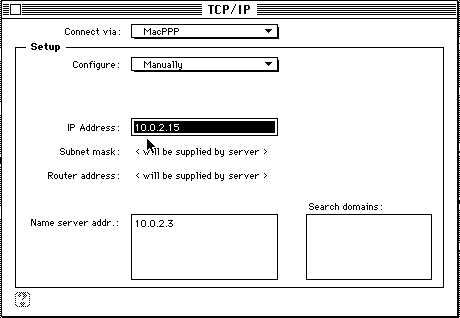
3. Open the TCP/IP control panel
4. Select MacPPP. Set your IP and DNS address manually. Your IP should be set to a value between 10.0.2.15-10.0.2.254. (SLiRP uses the lower addresses internally for different functions). Your DNS address should be set to 10.0.2.3.
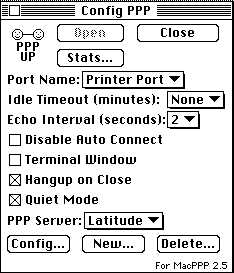
5. Open the MacPPP Config Control Panel
6. Choose the Port where your serial cable is attached to (In my case printer).
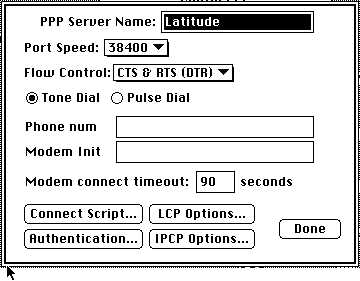
7. Click the config button.
8. Name your server and set the speed to 38400. Set flow control to DTR. Leave Phone num and Modem Init blank.
9. Click Connect Script. Configure with the following. One command on each line. As you will see we're essentially logging in to the terminal and launching ourslirp.shscript.
For those of you browsing without JPG support...
OUT CR WAIT ogin:OUT YOURUSERNAMECR WAIT assword:OUT YOURPASSWORDCR WAIT $OUT ./Documents/slirp.shCR WAIT SLiRP Ready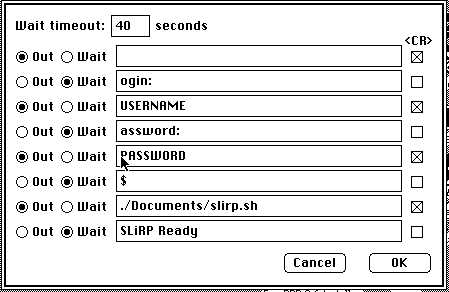
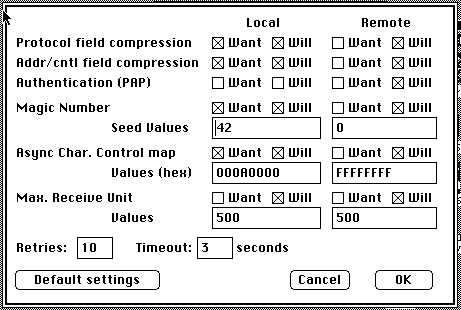
10. Click OK to save script and then Select LCP Options...
11. Change Local ASync Char. Control Map Hex value to000A0000
12. Change Local and Remote Max. Receive Unit Values (MRU/MTU) to500
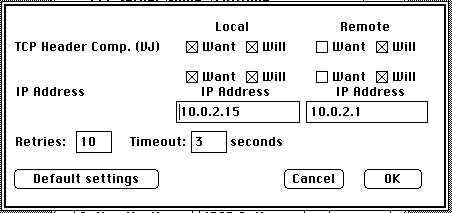
13. Click OK and the select IPCP Options...
14. Enter Local IP address as your value from your MacTCP or Open Transport TCP/IP settings (in my case 10.0.2.15) and Remote IP address of 10.0.2.1
15. Click Okay and then Done to finish configuring your connection.
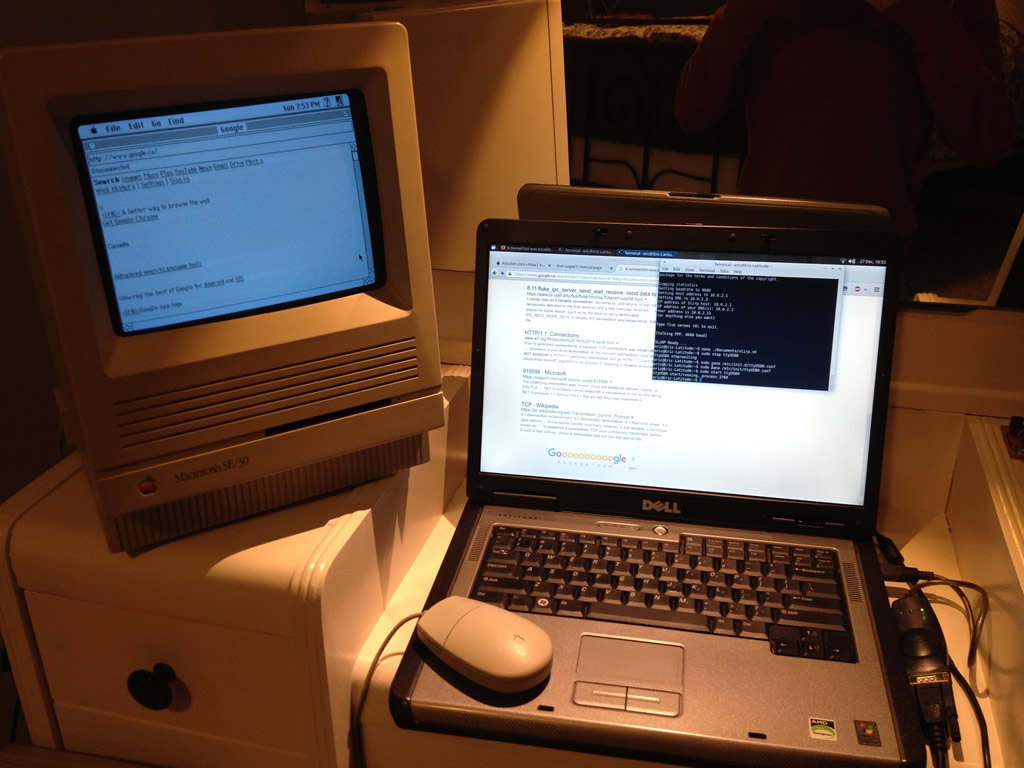
16. Click Open. If all is well you should see the status of the connection opening, running the commands from your connection script and finally two happy faces with the message PPP UP. Open up a web browser and away you go! Happy browsing!Links
Keacher.com: How I introduced a 27-year-old computer to the web
Serial Cable Guide for the CM11 / CM12 / ActiveHome / Macintosh
Ubuntu.com: SerialConsoleHowto
Configuring your Macintosh to use SLiRP
LowEndMac.com: Macintosh Serial Throughput
Downloads
Open Transport 1.1.2
MacPPP 2.5.3
Last Updated: January 2, 2020

