iMac DV on ATX
Preamble:
I happened to have a 600MHz iMac motherboard lying around, a slot loading DVD-ROM, an old VCR and lots of other spare parts. So here goes...
ATX:
The motherboard needs power and iMacs don’t use ATX Power supplies.
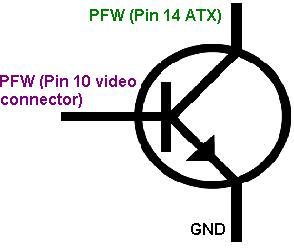
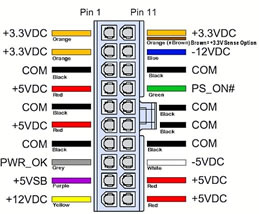
After searching on the Internet I found a site that gave me a pinout of both the iMac and the ATX power supply. For the most part this is simply matching the correct wires from each connector and splicing them together, the kicker is ATX requires a GND signal to turn on whereas the iMac requires a +5V level signal for power on. An NPN transistor hooked up like the image to the right will do the trick..
An alternate method would be to use a 7404 Hex Converter; I chose the NPN transistor method as it requires one less wire (but mostly because it was what I had available).Video:
Many G3 iMac hacks, which I have seen, have been done with 350 or 400MHz Motherboards. Apple must have changed something with the video once they hit 500MHz because a bare motherboard with just an ATX hack will function… but the display will be green.
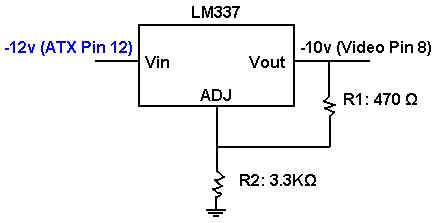
The solution is to apply –10v across pin 8 of the internal video connector, not the VGA connector.
The catch is ATX does not supply –10v, but it does give –12v. An LM237 is what's required, Here’s the circuit:
Aesthetics:
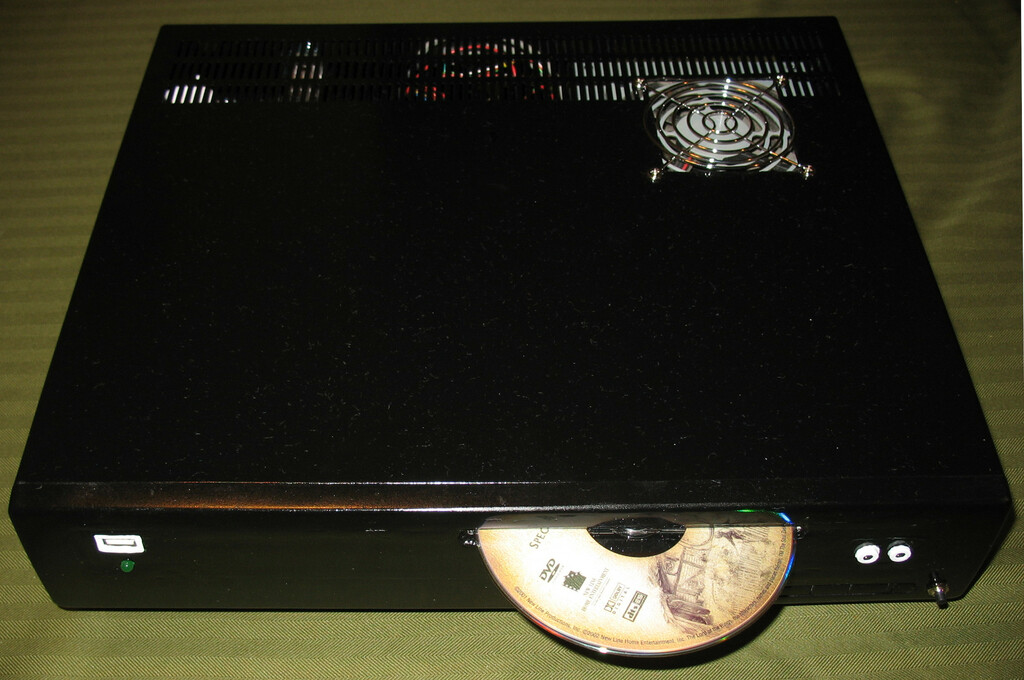
One of Kristen’s requirements for this project is “It has to look good or we’re not using it”. Honestly babe, I’m doing my best here. I chose to put the projects into the innards of an old VCR. After gutting it I had to do some heavy modification to get everything to fit on the inside. My Dremel has gotten quite a workout. The front panel required the most careful work. The VCR slot had to be glued shut and a new slot had to be cut for the DVD, other touches included holes for headphones, a front USB connector, a power button and an LED power indicator. The gaps in the front I filled in with No More Nails and I sanded it as smooth as I could before spray painting the entire thing a glossy black.
Another consideration was to cut a proper hole in the top to allow proper airflow to the ATX PSU fan.DVD Player:
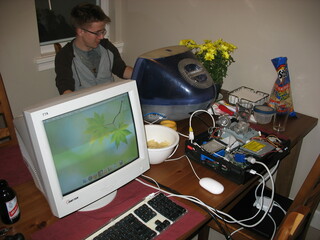
To test the system I was using a 17” CRT, but the real goal was to use this with TV primarily as a DVD player.

For video I purchased a VGA to RCA converter, which actually was very disappointing for quality. The other issue is that the monitor port will only support 1024x768 even though the chipset can technically go higher.
For sound I’ve adapted the internal Audio port to RCA, I’ve dremmeled out two holes on the back for left and right audio.
The final piece was to purchase a remote! I’m using a Griffin AirClick USB($14.00 on eBay). This is connected to the remaining internal USB connector so the base is not visible from the outside of the unit. The remote works very well over a considerable distance but I was a little disappointed with the layout of the buttons and the lack of customization.Testing and Other Notes:
I tested the system out for an evening playing Age of Empires II with my brother. I’d epoxyed an old Heatsink on the CPU to dissipate heat but it just cooked. I added a small fan and that seemed to fix it.
For Ethernet I have two options:
First I’ve channeled the internal 10/100Mb connector to outside of the case by making a small extender from a CAT 5e keystone and an RJ45 jack.
Second my motherboard supports an Airport card with an iMac adapter. I have both but the layout of my case prohibits its use…. Sigh, that was to be the killer feature. Maybe Rev. 2?
The original ATA cables were too small. They’re special as for some reason the iMac uses a laptop DVD drive and a full size ATA HDD. To compensate, you can easily make your own cable by modifying an old SCSI cable to accommodate the standard ATA HDD.What I’d Do Differently Next Time:
- Create the motherboard connector as an extender rather than a splice by removing the original ATX connector.
- Find a more versatile remote control.
- Find a better case that would allow usage of the Airport Card.
- Find a Motherboard that can support full HD video.
Revision 2.0
So the original case really sucked like I had mentioned earlier. I had everything really crammed in there and heat was a problem.
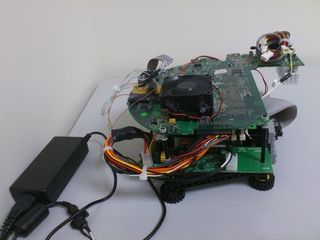
Additionally, this little box ended up as a webserver running Linux. I needed something simpler... Something better. Here are some pictures of a minimalist approach using Lego!
Only the bare essentials for running. Gone is the case and DVD-ROM. I've also replaced the ATX PSU with a PSU from a MicroATX case.

Want to hack your own?
If you’ve got an iMac with a dead PSU this is a good way to revive it. Here’s some advice:
- There’s a difference between slot loading and tray loading iMacs for the ATX hack. Be sure you’ve got the correct pinout!
- 350MHz and 400MHz G3 motherboards don’t seem to require the –10v video mod. 500, 600, and 700MHz models do.
- The Soft Power circuit is not necessary to get the iMac running but you’ll need a switch to independently power the ATX PSU on or off. Really you’re better off doing the circuit. In my experience it tends to fix some trouble with retaining the PRAM settings.
Pinouts
20 Pin Video Connector SDA 1 2 SDC GND 3 4 ? DCO 5 6 T5V ? 7 8 -10V HSYNC 9 10 PFW VSYNC 11 12 ? Blue 13 14 B-GND Green 15 16 G-GND Red 17 18 R-GND L/S 19 20 ?
26 Pin Connector Micro (White) 1 2 Micro (Black) Micro (Red) 3 4 Headphone Headphone 5 6 Headphone Headphone 7 8 Headphone Headphone 9 10 Headphone Headphone 11 12 NC Speaker L 13 14 Speaker L Speaker R 15 16 Speaker R PWR Switch 17 18 GND PWR LED 19 20 Sleep LED NC 20 22 NC 24VAC Phase 1 23 24 24VAC Phase 2 24VAC Phase 1 25 26 24VAC Phase 2
50 Pin Connector GND 1 2 Audio-R GND 3 4 Audio-L NC 5 6 +5V +5V 7 8 +5V +5V 9 10 +5V /RST 11 12 GND D7 13 14 D8 D6 15 16 D9 D5 17 18 D10 D4 19 20 D11 D3 21 22 D12 D2 23 24 D13 D1 25 26 D14 D0 27 28 D15 GND 29 30 Key-NC DMARQ 31 32 GND /DIOW 33 34 GND /DIOR 35 36 GND IORDY 37 38 CSEL DMARCK 39 40 GND INTRQ 41 42 /IOCS16 DA1 43 44 /PDIAG DA0 45 46 DA2 /CS0 47 48 /CS1 /DASP 49 50 GND
24 Pin Microfit Connector +3.3V (CPU) 1 2 +12V (CPU) GND 3 4 +5V GND 5 6 +5V PT 7 8 GND DCO 9 10 GND GND 11 12 +3.3V GND 13 14 +3.3V 24VAC Phase1 15 16 +3.3V 24VAC Phase1 17 18 +3.3V 24VAC Phase2 19 20 +12V (Sound) 24VAC Phase2 21 22 GND (Sound) +15V (FireWire) 23 24 +5V (Sound)
20 Pin ATX Connector “Bibliography”:
I can’t take credit for coming up with this idea; there have been many who have come before. I’m not smart, I just know how to Google really well.
iMac Rev E to ATX Conversion
Some good research
iMac ATX
Really good pinouts and diagrams
SL iMac G3 -> ATX Mod
An AppleFritter forum thread, very good links and this helped me figure out the green screen problem.
Conversion of an iMac Rev. B into an ATX case
Slot loader reference.
Last Updated: April 1, 2022