Overclocking the PowerMac G4 "Quicksilver"
Introduction
This hack is relatively easy to do and doesn't require any special parts. I read up on this hack and decided to do it myself on my 800MHz Quicksilver to bump it up to 867MHz.
With this hack in place I will be able to take advantage of a bit better speed and I can install Mac OS 10.5 without the OpenFirmware trick.
First Things
First thing I checked was the temperature coming off the heatsink. After running it for a while I opened the case. The heatsink was cool to the touch. This is good. Any overclocking is most likely going to raise the temperature coming off the processor which could lead to problems. Luckily the G4 has quite a massive heatsink on it so everything seems fine to me in its stock configuration.
Tools Required
For this hack you'll need:1 Phillips screwdriver
1 Flathead screw driver
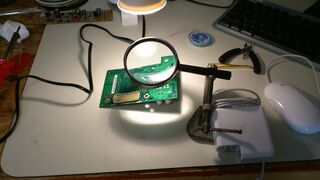
1 Soldering iron
1 Magnifying Glass
Solder
Solder Wick
Thermal Paste
Q-tips
Rubbing Alcohol
Disassembly
1. Open the side cover and remove the fan by the heatsink by removing the two Phillips screws on the back of the case.
2. Pop the two clamps holding the heatsink using your flathead screw driver. Start with the clamps at the front side of the computer and then pop the two at the back.
3. Pull the heatsink straight up and off of the processor and set it aside. Use your Q-tips and rubbing alcohol to remove the old thermal paste from the bottom.
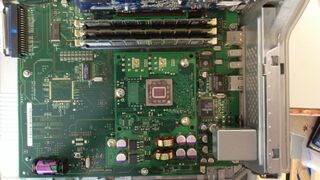
4. Remove the four Phillips screws holding down the processor card. Carefully pry up the processor card from its socket. Put the rest of the computer aside.
The Scary Part
Are you ready? Are you really sure you want to do this? Okay take a deep breath and steady your hand.
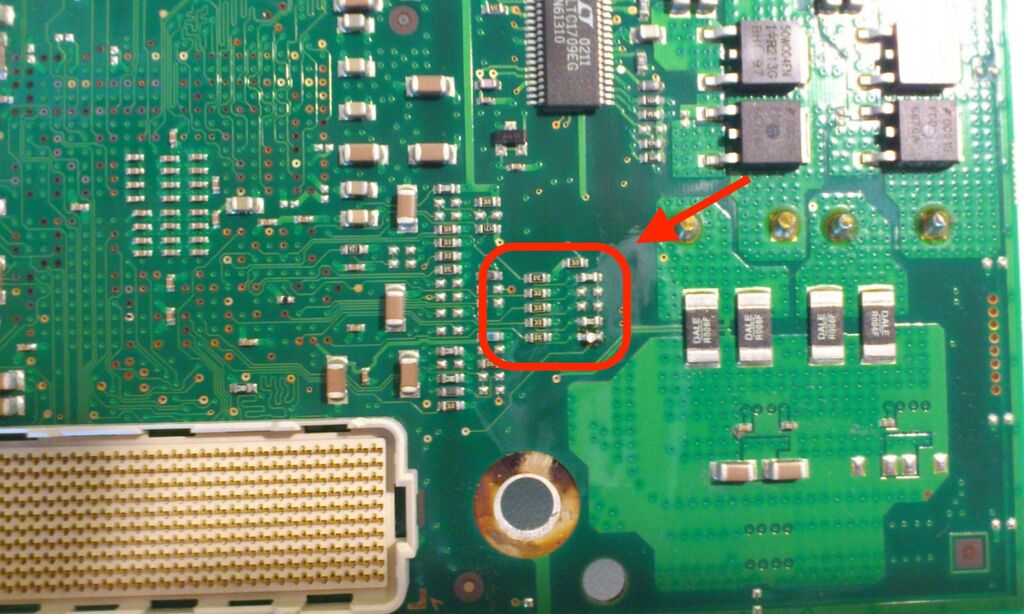
1. Take the processor card and turn it over. Locate the resister block as shown in the picture below.
2. Below is a closeup of the resister block. As you can see my processor is an 800MHz model. You can compare with the table.
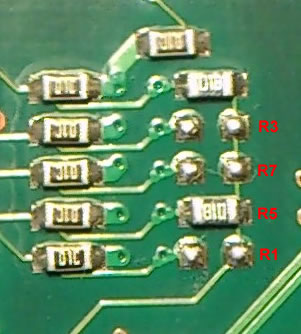
CPU Multiplier R1 R3 R5 R7 733MHz x5.5 R R 800MHz x6 R 867MHz x6.5 R R 933MHz x7 R R R 1000MHz x7.5 R R R 1066MHz x8 R R
3. I'm playing it safe and jumping my speed only to the next speed, 867MHz. It's best to be conservative as overclocking can cause unpredictable behaviour. As you can see from the table I'll need to add a resister or jumper across the R1 to make this work.
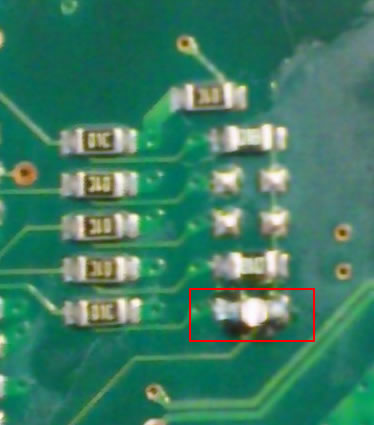
The existing SMD resistor is 1KOhm. There's probably a good reason for this so if you can jump the blocks with a similar resistor it's best to do so. I had trouble finding a resistor of that value so I simply jumped the resistor block using a blob of solder.
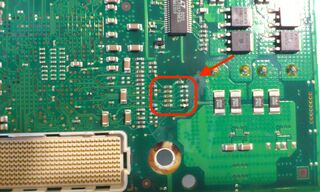
4. Modify the resistor block accordingly to jump your processor to the next clock speed using your soldering tools. Here's my job below.
5. Re-attach the processor to the motherboard. Add a fresh thin layer of thermal paste to the processor and re-attach the heatsink and fan.
6. Pray.
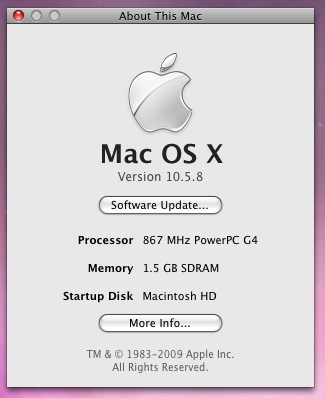
7. Plug the computer back in and fire it up. If all goes well you should get a successful startup. Check the Apple Menu > About this Mac and you should see your new clock speed reflected. If everything goes wrong, take it back apart and check to make sure you've done your soldering job properly and that there aren't any shorts and try again.
Results
Prior to the hack I ran a couple of benchmark utilities to check out my performance. Geekbench 2.1.13 scored 318 before and 319 after... Not much different really. XBench 1.3 is a little more comprehensive. On that test I scored 26.10 before and after 27.29. Again not a big difference really until you look at the details. Especially in the CPU section. Here's a side by side below:
800MHz 867MHz CPU Test 39.10
GCD Loop 66.91 3.53 Mops/sec
Floating Point Basic 25.05 595.25 Mflop/sec
AltiVec Basic 137.06 5.46 Gflop/sec
vecLib FFT 39.28 1.30 Gflop/sec
Floating Point Library 24.84 4.33 Mops/sec
Thread Test 29.02
Computation 34.66 702.25 Kops/sec, 4 threads
Lock Contention 24.96 1.07 Mlocks/sec, 4 threadsCPU Test 44.21
GCD Loop 72.97 3.85 Mops/sec
Floating Point Basic 29.92 710.92 Mflop/sec
AltiVec Basic 109.52 4.36 Gflop/sec
vecLib FFT 50.69 1.67 Gflop/sec
Floating Point Library 26.95 4.69 Mops/sec
Thread Test 31.35
Computation 37.25 754.65 Kops/sec, 4 threads
Lock Contention 27.06 1.16 Mlocks/sec, 4 threads
As you can see this is where the real performance increase happens. I find it interesting however that by bumping up my clock speed I somehow slow down my AltiVec Score... Curious... Anyhow raw computing power overall has increased so I'm happy.
In doing the benchmark tests I really noticed a couple of other bottlenecks that are hurting benchmarks in XBench. The User Interface Test only scored a 9.27 @ 800MHz and 9.72 @ 867MHz. The Memory test scored 26.13 and 26.18 respectively.
I've checked out some other benchmarks and it seems Leopard is largely to blame for the User Interface Test. I'm curious what my overall benchmark would be if I switched to Tiger.
As for the Memory Test there's not much that can be done here. The Quicksilver G4's use the outdated PC133 SDRAM running on a 133MHz system bus. This is a huge bottleneck for memory throughput. If it had a DDR Bus running at even 266MHz this I'm sure would vastly improve the memory benchmark.
Obviously this is not possible to upgrade but perhaps using a faster rated RAM (CL2 instead of CL3) might make a difference, however small.
Final Notes
One overclocker has noticed that by bumping his processor he had inadvertedly disabled his L3 Cache. This is due to the voltage settings being too low on the buck controller (CS5165 chip on the CPU card). If you are having this issue please visit the site below.
This user has also cleverly added dip switches to allow himself to change the clock speed at will.
Overclock and Voltage Tweaks
Links
PowerMac G4 "QuickSilver 2002"
G4 QuickSilver Overclocking (Optimize your Processor!)
Geekbench - Primate Labs
XBench
August 6, 2011
Last Updated March 8, 2026